Showing posts with label Magical Christmas. Show all posts

Tuesday, December 10, 2013

Jolly Christmas Cards by Adriana Bolzon


Hello there everyone, It's Adriana here and
is it my turn again today 
Today I have created another very simple and easy christmas card, for
the background I embossed some white cardstock with the
the new Wrapped in Joy embossing folders 
this one is called
"Jolly Christmas" C0723595.


At the top of the card I used the Diecut 
 from Magical Christmas Diecut collection called
"Tinsel "  CO723567.


I cut a circle from the Couture creations
 Circle Nesting Dies for the bauble.

Adding some ribbon, flower and leaves.


also here is another Christmas card using the
cut to create the square doily background in green pokadot paper.


Thanks for looking :)
Hope you have time to create some christmas cards too.
Merry Christmas to everyone. :)
 

Wrapped in Joy embossing folders CO723595 Jolly Christmas
"Tinsel" CO723567 Magical Christmas Die cut

Please make sure you add your email address to get the latest newsletters.

Don't forget to join 
Couture Creations FACEBOOK

for all the latest updates from Couture Creations.
Thanks for looking
Cheers Adriana xx:)

Don't forget to enter our

12 days Giveaway
We have 3 Couture Creations Prize Packs valued at $50AUD each to giveaway
all the Details on how to enter are HERE

Wednesday, December 4, 2013

Reindeer Noses by Tracey Cooley

Hi Creators

Every year my 2 beautiful daughters like to give things out to their classmates. Last year was Rudolph chocolates and reindeer food.. this year they decided they wanted to give out reindeer noses....

I purchased some clear plastic bags, malteasers and jaffas' from my local supermarket. Adding 8 malteasers for each reindeer and 1 red for Rudolph to each bag. Cutting cardstock to match the width of my bags and the length required to go from the bottom of the bag and fold over for a front tab.
I then printed all the reindeers names on the back and the name of the contents on the front.

Then with the Couture Creations Scalloped Rectangle nesting dies I feed the cardstock through the die so only one end would cut and scalloped the front edge. I then stapled it to the bag of noses and set about making a cute Rudolph to decorate the front.


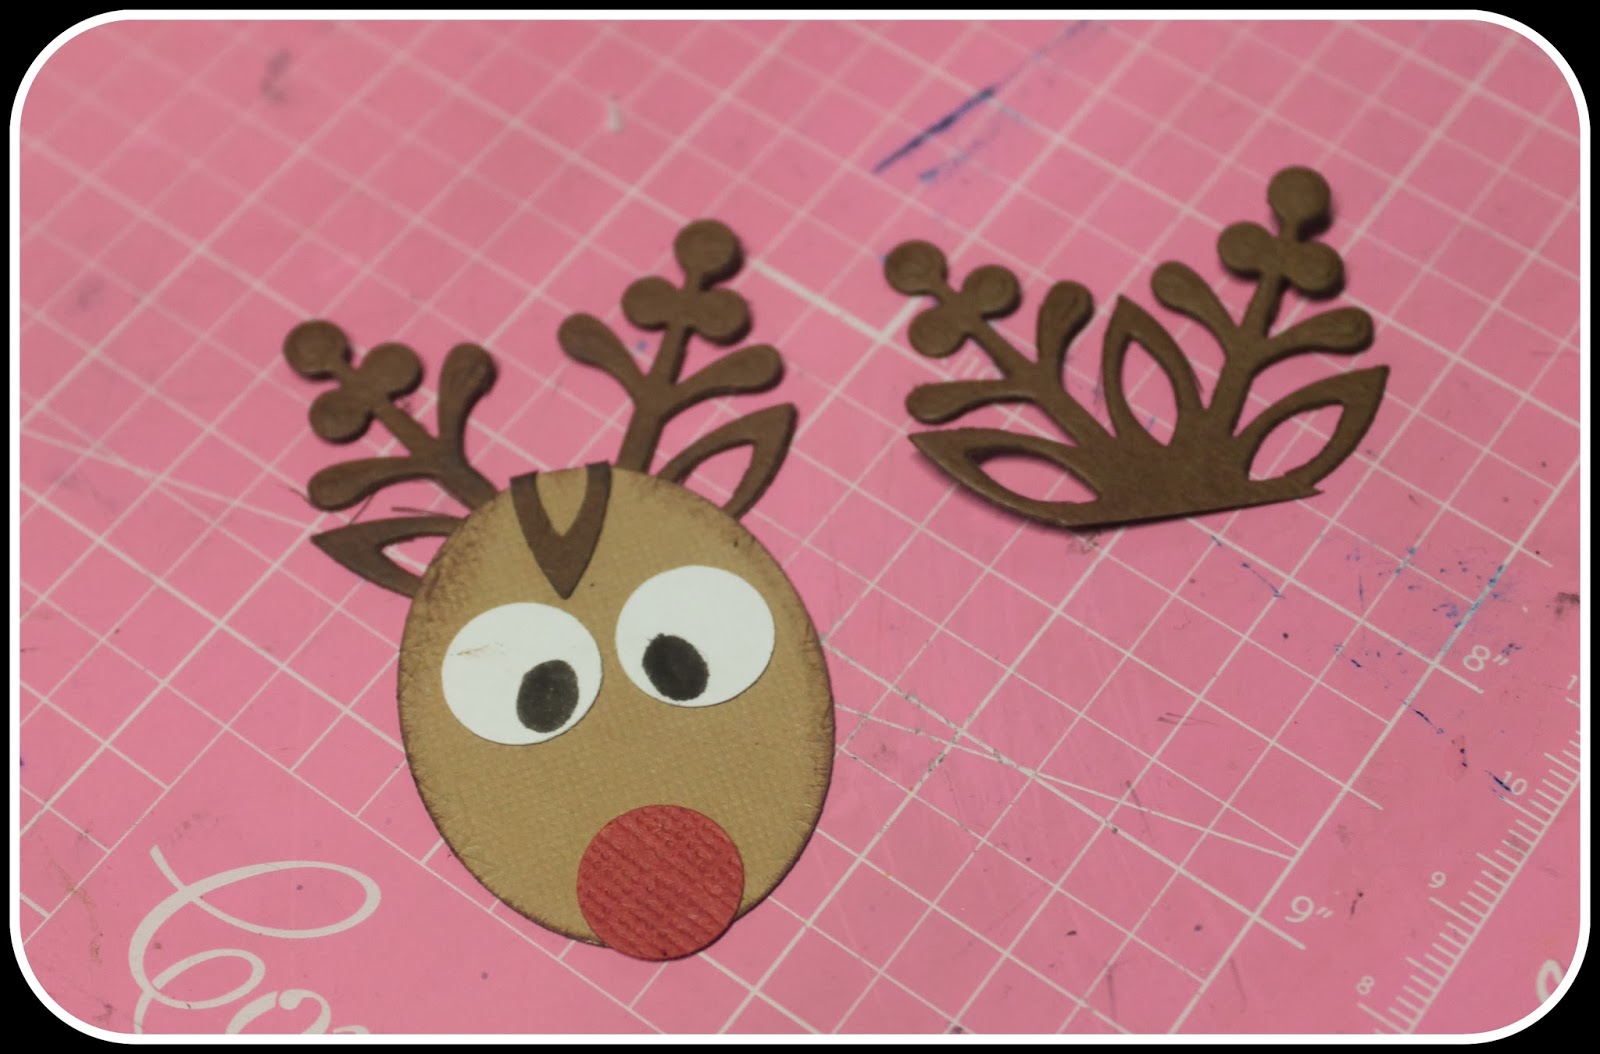
From the Couture Creations Oval Nesting Dies I cut 1 of the 2nd smallest ovals from light brown cardstock. Cut 1 Couture Creations Magical Christmas Tis the Season Die in a darker brown.
ink around the oval with a brown ink for definition.


Cut the snowflake so that 3 leaf shape and 2 stems shapes are left as above  ( you will get 2 from each snowflake)


add the half snowflack to your oval so that the leaf shapes become his ears and the stems become his antlers, folding the middle leaf shape over to form a tuft of mane. Add some small circles for eyes and a nose and viola.... RUDOLPH!! Attach this cute red nose reindeer to the front of your noses...repeat for all classmates and send to school!
 
Keep on Creating!
http://jordayla.blogspot.com.au/

Couture Creations Products Used
CO723044 Nesting Dies Oval
CO723047 Nesting Dies Scallop Rectangle
CO723557 magical Christmas Tis the Season
 

Saturday, November 30, 2013

December Daily Mini Album by Jo Piccirilli

Hey everyone!  Well Christmas time is well and truly upon us.  Didn't that sneak up on me!  We were set a little challenge this month on the DT to come up with something along the lines of December Daily.  For those that aren't sure what this is, it is like a journal that you record all the things you do in the lead up to Christmas.  Here is my take on it.


I have made like a file folder to put my pics on of what my little family gets up to in the weeks leading up to Christmas.  I used a heap of Couture goodies in this album.  On the front is the Irish Dreams Doily Die from the Fantasia Collection.  I have also used the Rudolph die and some glitter paper for a bit of sparkle.  The flourish is Moments in Time again using some glitter paper.  The "Merry Christmas" is just one of many pieces that an be cut from the paper pad.

I have used the 12 x 12 Vintage Christmas paper pad to cover my folder.  This has heaps of pieces that can be fussy cut and used as embellishments. Her is a look at the inside.


In the top corner I have used the Mistletoe die and added a few red gemstones to the centre for a bit of extra interest.  The two corner pieces are were cut again from glitter paper using the Clements die.

 
I have embossed some pearlised red cardstock with the Moonlit Berries embossing folder and created a pocket for some tags.


In the paper pad there is a sheet of paper with these Christmas sentiments on.  Perfect for to make simple and quick Christmas cards using my rectangle and scallop rectangle nesting dies.  Again I added the  holly at the bottom.  Once you have given your cards away you could then use this pocket for the Christmas cards you receive!


This next part of the album has lots of space for photos and journaling

I used another of the sheets in the paper pad that was like a Christmas countdown and cut them out as embellishments.


This last page opens up to give a little more room for more photos.  Again I have used the Moonlit Berries embossing folder and at the bottom is the Santa's Sleigh die.


Thanks for stopping by and letting me share.  Hope I have inspired you to have a go at your own December Daily.
 
Until next time
 
Couture Creations Products Used

12 x 12 Paper Pad Vintage Christmas CO723551
Moonlit Berries Wrapped In Joy Collection CO723596
Irish Dreams Doily Die Fantasia Collection CO723224
Rudolph Magical Christmas Collection CO723560
Santa's Sleigh Magical Christmas Collection CO723561
Moments in Time Die CO723434
Clements Die Sophia Collection CO723500
Mistletoe Magical Christmas Collection CO723563
Rectangle Nesting Dies CO723046
Scallop Rectangle Nesting Dies CO723047
Oval Nesting Dies CO723044
Scallop Oval Nesting Dies CO723045
Double sided 6mm tape
Gemstones


https://www.facebook.com/couture.creations.aus


Wednesday, November 27, 2013

Scalloped Paper Christmas Tree by Kerrie Gurney

Hi it's Kerrie,  with Christmas fast approaching I am in full decorating mode. I just love creating special little décor items for our home and also to give to friends.

I made lots of these paper trees last year and this year a friend asked me to create one for her so I thought I would add a twist to my plain trees by using Couture Creations Scallop Square Nesting Dies to give this tree a cute edge.


this tree is super easy to create,


Die cut 12 of each of the 5 smaller sizes of the Scallop Square nesting dies from old book paper. I die cut 6 sheets at a time, the paper is thin enough to cut through 6 sheets at a time. 


cut a piece of cardboard slightly smaller than the largest die cut square and glue one sheet of die cut book paper, this will be the base of the tree

 
you will need a skewer and a peat pot or some type of pot for your base, push the cardboard base onto the skewer and then hot glue the base to the pot


now starting with the biggest size start layering on the book paper squares
when layering them leave a gap and alternate to give the tree character

 
finish off by adding a poinsettia as a tree topper, die cut 2 small petals and on large and hold together with a small brad

 
smoosh a bit of red Glitzin' Glamour Glitter Glue to the petals and pinch them to add life to the poinsettia


Embellish the base of the pot with some book paper and a poinsettia
 
 
TIP : you could add Crystal Glitzin' Glamour Glitter Glue to the edge of each layer to add some sparkle, or spray the whole tree with adhesive spray and sprinkle with glitter.
 
 
Couture Creations Products Used
 
Happy Christmas Creating
 
 
http://kerriegurney.blogspot.com.au/
 
 
https://www.facebook.com/couture.creations.aus


Monday, November 11, 2013

Cardinal Kisses by Adriana Bolzon

Hello there everyone :) is it my turn again today 
Today, I have another Christmas Card to share with you all


Using the "Wrapped in Joy" CARDINAL KISSES C0723589 Embossing folder.


I placed some dark green cardstock in the folder
then slightly sanded the embossed image with
the Couture Creations SANDING BLOCK

I then adhered the green cardstock on to some White card
to create the card.

Using the Couture Creations SOPHIA DIECUT - CONNEXION for the leaves.
CO723506


adding some punched vines leaves, flower clusters and twine.
With some white card stock, I cut out words with the
 Merry Christmas C0723575
I just trimmed off the hanging bits.


I finished off the card with some gorgeous

I also created a pocket inside the card 
with a strip of folded card, and another piece of a strip
of embossed and sanded edge for a little more detail.
Great idea for gift cards or money gifts.


Couture Creations Materials
Couture Creations embossing folder CARDINAL KISSES C0723589 
Couture Creations SOPHIA DIECUT - CONNEXION C0723506
Couture Creations Merry Christmas  C0723575
Please make sure you add your email address to get the latest newsletters.

Don't forget to join 
Couture Creations FACEBOOK

for all the latest updates from Couture Creations.
Thanks for looking Cheers Adriana xx:)


Friday, November 8, 2013

Christmas Centrepiece and Bon Bons by Kerrie Gurney

Hi everyone it is my turn on the blog again and with less than 7 weeks until Christmas I thought it was time to start creating some décor pieces. This Christmas I am repeating my theme of Red, Cream/White and Kraft that we had last year as I loved it so much, with lots of old book paper thrown in.

I have used Couture Creations Magical Christmas Eve Decorative Die for both of these very easy projects.

Bon Bons

When I saw these Bon Bons in the store I knew they would be perfect for our Christmas theme but they were a bit boring and needed a bit of something added to them to give them a bit more Christmas feel. I wanted something that didn't take a lot of effort as these would be tossed in the bin after they had been pulled open on Christmas Day.
My solution was to add  some die cut poinsettia flowers to these store bought bons bons taking them
from drab


 to fab
 
 
with not much effort, you could add more embellishments if you like but as they will just be thrown out I thought this was enough.


To create the poinsettia flowers using red cardstock run the dies through a die cutting machine and then while leaving the cardstock still in the die, run it through the machine again using the Couture Creations Latex Embossing Mat to give the flower petals embossed detail.
 
 
then pinch the petals to give them more character


As these bon bons will be thrown out once pulled apart, I only used one each of the large and small petal die cuts, diecutting the middle piece from gold cardstock and adding some Red Glitzin' Glamour Glitter Glue to add some sparkle.

Table Centre Piece
 
Starting with a store bought pine table centre piece
 
 
 hot glue some glitter baubles and some poinsettias created from old book paper. Create the poinsettia flowers the same way as the red poinsettias but to save time you can die cut 4 pieces of book paper at a time book paper it is quite thin so you can cut 4 sheets at a time. To create a fuller poinsettia flower use two large and one small die cut petal for each flower, die cut the centre from gold glitter cardstock.


Here is a close up look at the candle. To embellish the candle just add some pleated hessian, tie some jute string around the middle of hessian and add a poinsettia flower created using old book paper and gold glitter cardstock for the centre and the leaves.

*Tip use a battery operated candle that way there is no chance of your embellishing catching fire and you won't ruin your trim

Couture Creations Products used
CO723562 Magical Christmas Eve Decorative Die
CO721979 Red Glitzin' Glamour Glitter Glue
CO723514 Latex Embossing Mat


Thanks for visiting and I hope I have inspired you to create some table décor for your Christmas table.

Don't forget to follow us on Facebook
 
https://www.facebook.com/couture.creations.aus
 
 
happy creating
 
http://kerriegurney.blogspot.com.au/