Showing posts with label doily dies. Show all posts

Tuesday, December 10, 2013

Jolly Christmas Cards by Adriana Bolzon


Hello there everyone, It's Adriana here and
is it my turn again today 
Today I have created another very simple and easy christmas card, for
the background I embossed some white cardstock with the
the new Wrapped in Joy embossing folders 
this one is called
"Jolly Christmas" C0723595.


At the top of the card I used the Diecut 
 from Magical Christmas Diecut collection called
"Tinsel "  CO723567.


I cut a circle from the Couture creations
 Circle Nesting Dies for the bauble.

Adding some ribbon, flower and leaves.


also here is another Christmas card using the
cut to create the square doily background in green pokadot paper.


Thanks for looking :)
Hope you have time to create some christmas cards too.
Merry Christmas to everyone. :)
 

Wrapped in Joy embossing folders CO723595 Jolly Christmas
"Tinsel" CO723567 Magical Christmas Die cut

Please make sure you add your email address to get the latest newsletters.

Don't forget to join 
Couture Creations FACEBOOK

for all the latest updates from Couture Creations.
Thanks for looking
Cheers Adriana xx:)

Don't forget to enter our

12 days Giveaway
We have 3 Couture Creations Prize Packs valued at $50AUD each to giveaway
all the Details on how to enter are HERE

Sunday, December 8, 2013

Sweet Happy Birthday Card by Jo Piccirilli

Hello!  Hope you are all well and enjoying the lead up to Christmas. 

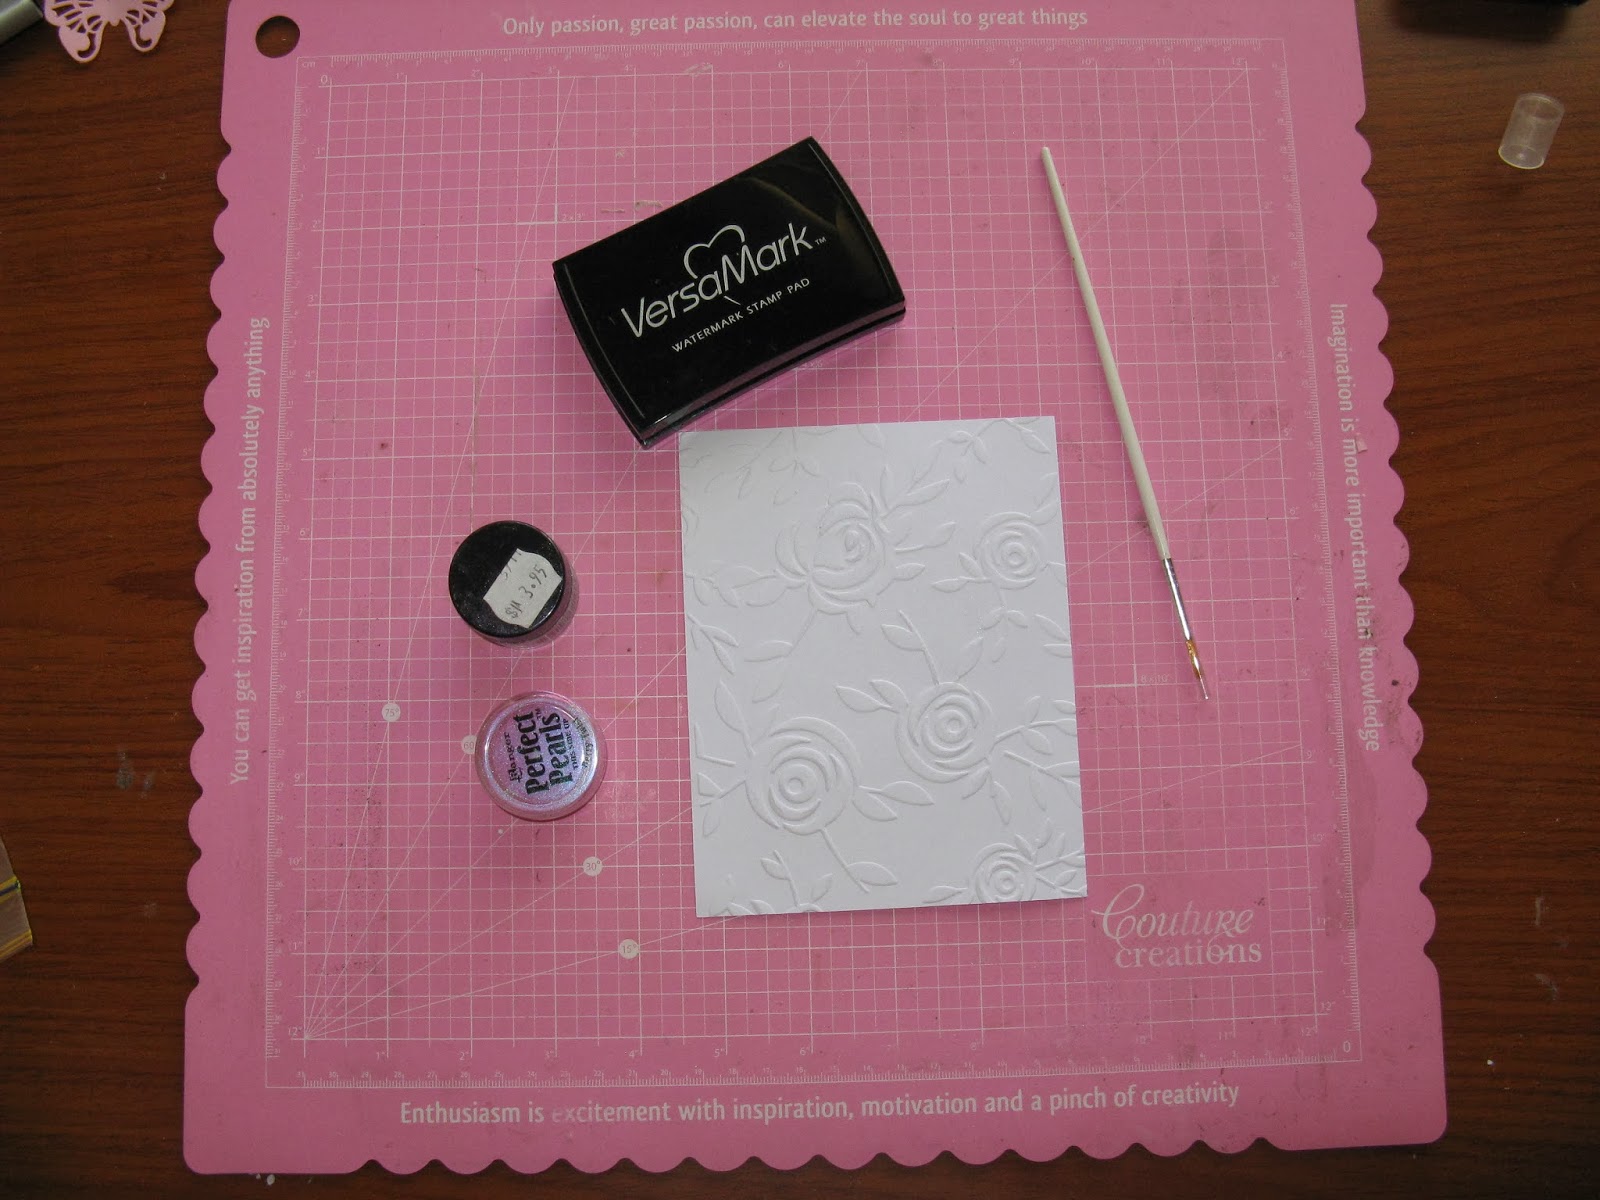
Today I have a card to share with you using the new Large Joe's Garden embossing folder and a quick tutorial on how I achieved the colour on the card. 


Here's the supplies you will need.


Using the Joe's Garden Embossing folder, emboss some white cardstock.

Next grab some Perfect Pearls and a Versamark inkpad along with a fine paint brush.

Very gently rub the Versamark inkpad over the raised part of the cardstock.  Be careful not to press to hard.


Very gently brush over the wet part with some Perfect Pearls and flick off the excess.


Once you have finished colouring your embossed card, give it a light mist with a water spritzer.  This will "set" the powder and give a soft and shimmery effect.  Its a little hard to see in the photo but trust me this really is shimmery!.

I have then added my Alycone Doily from the Royal Jewels Collection and also used my Circle and Scallop Circle Nesting dies for my sentiment to finish my card and of course some hand stitching with my paper piercer from the 3 in one Tool Set.

Thanks for stopping by and a very merry and blessed Christmas to you all.
 
Don't forget to enter our
12 days Giveaway
We have 3 Couture Creations Prize Packs valued at $50AUD each to giveaway
all the Details on how to enter are HERE

Couture Products used.

Large Joe's Garden Embossing Folder All Occasions Collection CO723451
Alcyone Doily die Royal Jewels Collection CO723112
Scallop Circle Nesting Dies CO723041
Circle Nesting Dies CO723040
Double Sided 6mm Tape
3 in one Hand Held Tool Kit


Friday, December 6, 2013

Treasured Memories Canada | Bower Bird Mini Album Class with Pauline Pierantozzi

Couture Creations is very proud to be sponsoring Pauline's class

Date: January 5th
Time: 10am - 6pm
Cost: $100.00
 
Designed by Pauline Pierantozzi from Australia exclusively
Edmonton Canada
Class image
This 9x9 inch mini album takes memory keeping to the
extreme. The book is an eclectic collection of found and
treasured items, with over 12 pages of flaps, pockets and
divided pages to house oodles of photographs.
 
Combining the mini album concept with altered art is what
makes this album unique. The album is attached to a backing
board which resembles as picket fence so that it can be hung
like a piece of art on a wall or stand on an easel. For those
of you who are not sure about an album on a wall, then the
backing board can be removed and the album used on a coffee
table or bookshelf.
 
Using a plethora of paper craft products from Australia and
the USA, Pauline has created a showstopper album which
focuses on techniques using embossing, stamping, die cutting,
distressing and more. The Couture Creations paper line that is used in the album
will not be released until CHA 2014 – customers of Treasured
Memories will be the first in the world to use these products.
 
This full day workshop promises to be action packed, fast
paced and a whole lot of fun with an Aussie girl who has over
12 years of teaching experience in Australian stores and paper
craft events. Pauline is known for her compassionate, giving
and patient teaching style.
 
Bookings are essential and kits are strictly limited.
 
Join me on Sunday January 5th
for a full day workshop and
create your own Bower Bird Mini Album.
Pauline
I have been involved in the Australian paper
craft industry in the capacity of educator and
advocate for well over 12 years, resigning
from my teaching position to follow my
passion for all things paper. I live on a
Pineapple Plantation on the Sunshine Coast
in Queensland, Australia with my fabulous
husband Peter, and my two equally beautiful and talented
teenage daughters Jordan and Sidney. Family life and
everything it encompasses is important to me.
 
After being diagnosed with cancer late last year I was even
more passionate about being creative with my memories and
the near thought of not having those memories encapsulated
for my daughters frightened me and the importance of not only
memory keeping for myself but also educating others about its’
importance become my drive.
 
It is an absolute honour for me to travel to Canada and teach at
Treasured Memories – which I am hoping will be the beginning
of my international educator role. Being involved in the industry
for so long has afforded me many friendships with some of
the world’s most compassionate people and when Trisha
Ladouceur recommended me to her favourite scrapbooking
store I was humbled and honoured to be considered so highly.
I hope that you will join me on Sunday January 5th
Memories for a unique memory keeping project and altered art
project.
 
Please Visit Treasured Memories Blog for booking details

Sunday, November 24, 2013

Candy Bottle by Pam Bray

 
Hard to believe that Thanksgiving is Thursday....but it is never to late to make a party favor or two....so today I would like to share with you the Candy Bottle I made to place at each guest place  setting.

 
I started with a small bottle and filled it with candy
 
 
Taking some pretty pattern paper that I used a decorative die on I placed Double Sided Tape on each piece and set them to one side
 
 
 I ran a piece of Core'dinations paper through my embossing machine using the
Endless Embossing Folder
 
 sanding it off lightly with my Sanding Block

 
I added the borders that I previously prepared to the embossed piece. 
 
 
Placing a piece o the 18mm x 50mm Double Sided Tape at the end and a few pieces on the back side of the embossed band
 
 
This will help secure it to the bottle and make a nice finished closure to the border band when you place it around the bottle

 
Cut one of the Scallop Circles from pretty pattern paper and place on the lid o the bottle with your Double Sided Tape
 
 
Embossing a few of the leaves using the Endless Embossing Folder, sand them with your Sanding Block and fussy cutting each leaf out, setting them to one side to use on your Candy Bottle lid
 
 
Cut out several of the Sunflower from the Sunflower Nesting Die, spray with water, wad them up and allow them to dry completely
 
 
Add the leaves that you had set to one side to the top of the bottle, glue your Sunflower pieces that you have straighten up a bit to the top of the lid, make sure to keep them scrunched up....add a bronze gemstone to the center. 
 
 
Wrap the brim of the lid with some pretty ribbon, add a few tags or even your guest name to the bottle and place at each of your table setting or give away after the days event.
 
I hope you have a fabulous and joyous Thanksgiving.
Hugs Pammejo

 Couture Creations Supplies:
CO723212 Sunflower Nesting Dies
CO723041 Scallop Circle Nesting Dies
CO723047 Scallop Rectangle Nesting Dies
CO723294 Endless Embossing Folder-All Occasion Collection
CO721965 Double Sided Tape
CO721983 Double Sided Tape
Sanding Block
Premier Cutting Mat
Precision Trimmer
Handheld Essentials
Precision Scissors
Bronze Gemstones


Friday, November 22, 2013

Product Showcase | Dream Boat 3 in 1 Collections Revisited

Our UK Distributor Creative Expressions had our Dream Boat Collection featured on Ideal World in the UK last week if you live in the UK and missed it here is the link, if you are not in the UK he is a look at our Dream Boat Collection.
Our Dream Boat collections combine stamps, dies and an embossing folder for quick, stunning projects in matching combinations…

 Butterfly Notes – CO723400
Doilies – CO723401
 Floral Wreath – CO723402
 Ornate Frame – CO723403
 Pattern Quilt – CO723404
Party Time – CO723405


For inspiring projects created using our Dream Boat Collection follow our board on Pinterest

 
 View our Design Team's projects including step by steps using Dream Boat Collection
HERE

 
https://www.facebook.com/couture.creations.aus
 

Monday, November 4, 2013

Santas Little Helpers by Jo Piccirilli

Hi everyone!  Well we are now just one month or so away from Christmas!  How did that happen?  As you can see from this blog post I'm still scrapping last years photos!


For this layout I have used the 12 x 12 Premium Paper Pad - Vintage Christmas.  These paper pads are fantastic as they have lots of little pieces that can be cut out either by hand or using your nesting dies and used for embellishments.

 
I have embossed a red and green piece of Core-dinations cardstock and sanded it back to reveal a the kraft card underneath.  The red piece I have patched to make it a little bigger for my page and then managed to cover the seam with my photos and other embellishments.
 
Using the Alcyone Doily die  from the Royal Jewels collection I cut my doily in half and inked it before placing it in the top right and corner and the left hand side.
 
The two holly cuts are the new dies from the Magical Christmas Collection called Mistletoe.  I have just added some red gemstones to a centre of the holly to make it a little more "Christmassy".
 
Using cereal boxes I have cut out the Damaris die from the Sophia Collection.  I cut it twice and just stuck them together to give them a little more thickness and then inked over them and placed them under my photos.
 
I have also gone a little nuts with the hand stitching again!  This was done with my favourite tool that I just can't live without, my Paper Piercer from the 3 piece handheld tool set.
 
These photos are now so precious to me.  This was the last Christmas we got to spend with my dear father in law.  He passed away 3 weeks after Christmas.  Never did we think that it would be our last Christmas together!  Just goes to show - you can never have to many photos to scrap!
 
Thanks for letting me share.
 
Until next time
 
 
Couture Creations Products used:


Tuesday, July 9, 2013

Remember this moment by Jo Piccirilli

Hi everyone, Jo here popping by to share a layout I have created with you.


I am slowly going through my mum and dads wedding album and scrapping all their photos and hoping to have it done in time for their 50th wedding anniversary in a year or two.  What a huge job!

I have used lots of Couture goodies on this page.  I started by embossing some patterned paper using the Large Damask Flourish embossing folder  and then sanding over the top.


Then using my Victorian Square Nesting Dies I cut out a couple of "tabs".


 To make my photo mat, I used Scallop Rectangle Nesting Dies.  I cut two and placed them on top of each other.


My flowers were made using the Roses Nesting Dies.  I cut out a few. 


Scrunch them up.  You don't need to be too careful.  It all adds to the look.


Then layer them on top of each other and finish with some gem stones


I love this embossing folder for leaves!  I have used Turkish Delight embossing folder with some core paper and sanded it pack to leave a white washed effect.  Cut around the leaves and tuck under your flowers.


Next, I went nuts with the hand stitching!  I LOVE to stitch on my papers and I love the look that you get with the hand stitching and doubling up your cotton.  So, using my Paper piercer from the 3 piece tool kit I stitched all around all of my papers.


Using the Kaleidoscope Heart die I cut out this heart using felt.  I ran it through my machine a couple of times just to make sure it cut right through.  No problems at all!  I like how it just gives my flower cluster some different texture.


Finished off with Lily G doily die and my favourite Tranquility die.  I also slipped in a strip off of the Pastorale embossing folder.

Thanks for letting me share :)


Couture Creations Products used

CO723409 Kaleidoscope Heart die
CO723160 Pastorale embossing folder
CO723113 Lily G doily die
CO723435 Tranquility Die
CO723252 Turkish Delight embossing folder
CO723218 Roses nesting dies
CO723047 Scallop Rectangle nesting dies
CO723048 Victorian Square nesting dies
CO723449 Large Damask Flourish embossing folder
3 piece Handheld Essentials Tool Kit
Gemstones
Sanding block


Until next time


Monday, June 3, 2013

You & Me by Jo Piccirilli

Hello!


It's Jo and I'm back today with another layout to share with you.


This is a very rare photo of my mum and I together.  We always seem to be the ones behind the camera!  So there is my first tip - try and get pics of yourself and don't be afraid to scrap them!
 
To create this page I started by stamping and flicking some mist over some white cardstock


Cut your patterned paper to size and mat onto some black cardstock and adhere to your page.
 
 
I then used the Bouquet embossing folder from the Serenity collection.  What I LOVE about Couture embossing folders is that they have a little slit at the top of the folder so your can feed a long piece of paper through and continue embossing without cutting your paper.  How cool is that?  Couture Creations are the only ones to have this unique design. 
 
So I ran a piece of co-ordinations cardstock through the cuttlebug and then gently sanded it back with a sanding block.
 
 
Once you have stuck this onto your page you can now start and place your embellishments.
 
To embellish this page I have used a few blossoms from my stash.  I also used the Lily G doily die from the Royal Jewels collection.   I cut two out of just plain Reflex copy paper and placed them under my photo.
 
To make the little hearts I used the hearts nesting dies and cut them out of light weight chipboard.  I then painted them with some Tim Holtz distress crackle paint.
 
 
Thanks so much for stopping by!  Until next time
 
Couture Creations products used