Showing posts with label Off The Page. Show all posts

Wednesday, December 11, 2013

Christmas Daily by Sue Smyth


With the Christmas season upon us, it is a really nice thing to record our
 daily preparations, memories of the past and traditions that we have each and ever year.

If you are like me and time poor, make the cover of this mixed media book up
in advance and just slip the pages in as needed when you do them.

I have made this sturdy mixed media book from an old Readers Digest book.
Add lots of glimmer mists and glitter along with a few bits n pieces 
in my stash.


How to make the cover 


Simply use Couture Creations Craft Knife to remove the inside from the cover of book 


Layer over hand towel and adhere down with gel medium, allow to dry.  
Emboss cream cardstock with  Moonlight berries folder and adhere to cover.
Cut Ivy set doilies from kraft cardstock and adhere to cover as pictured.


Paint with Gesso and allow to dry  


Spray with glimmer mists, and use an alcohol pen to colour the berries on the Moonlit berries folder.


Rub gold paint over the raised areas. To add a sparkle to your cover using your finger smooch with Crystal Glitzin' Glamour Glitter Glue


Emboss white cardstock with A magical time embossing folder, trim out the greeting 
you desire and adhere to cover with 3 D foam tape.
Rub over red ink and gold paint.


Create a flower
Step 1
Cut 2 of 3 sizes with the Roses die from red cardstock, 
pierce a hole in the centre of each.
Snip around the edges to create petals.
Step 2
Gather together several stamens and glue together.
thread through the holes of the flower starting from the smallest 
to the largest.
Step 3
  Spray with water and scrunch up to create a flower. 
Dry off to hold in shape.
Spray with adhesive and sprinkle with glitter.
Step 4
Adhere to cover along with assorted bits and pieces. Rub 
extra elements with gold paint.

Cut Connexion die from green cardstock, spray 
with adhesive and sprinkle with glitter.
attach around the rose flower.

For the Inside 

Trim assorted cardstock to make a folded page that fits the inside of your book.
Create as many pages as you think you will need.
Dry brush gesso over the edges.

Tie bakers twine around the fold of each page. Align the knots
to the bottom of the fold. 

Punch a hole into the spine of the book with a Crop-a-dile and 
thread  organza ribbon through the hole and 
through each strand of bakers twine and back through the hole so both ends
come through the hole.

Handy Hint set and eyelet over the hole to make it sturdy


Tie the ribbon into a bow on the outside of the spine.
This way you can add more pages as needed.

Use Couture Creations Vintage Christmas Paper Pad to 
Decorate as desired with the ordinary and traditional things you do
each Christmas 


Happy Crafting & Merry Christmas 
 
 
Couture Creations Products Used


Don't forget to enter our
12 days Giveaway
We have 3 Couture Creations Prize Packs valued at $50AUD each to giveaway
all the Details on how to enter are HERE


Monday, December 9, 2013

Awesome Teachers Gift by Tracey Cooley


Hi Creators

Tracey here with another classroom creation... Every year I struggle with what to buy teachers for Christmas but find that this little box of goodies is a favourite of mine as it is somewhat useful.... I think!

 
I purchased this craft organizer from my LSS and filled it full of stationery items like paperclips, erasers, push pins etc and in the empty spots CHOCOLATE!
I then used some school pattern paper that I had in my stash to decorate the top of the container. Adhering it to the container with Couture Creations 18mm Double Sided Tape ( I love this wide tape for projects like this, it assures a really strong bond)
 
 
Using my Couture Creations Nesting dies I cut some random shapes from matching Pattern Papers... Victorian rectangle, circle and after printing a quote (I am a teacher what's your super power?) a scallop rectangle.
 

 Ink edges if desired and place wherever you think they look good on.


To personalise my box of useful bits and bobs I have taken some chipboard letters and painted them black then let them dry... Then I have coated them with Couture Creations Glitzin Glamour Black and then mixed in a little of the Glitzin Glamour Crystalina for a bit of extra sparkle without over doing it, then let it dry,
***TIP: mixing your Glitzin Glamour colours together will give you different shades and some very pretty effects..
Once your Glitzin Glamour is completely dry coat with dimensional magic and let dry... For extra depth of field and ultra shine complete a second coat of Dimensional magic.
 
Once finished it will be a gift fit for any Super Teacher!
 
Wishing you a very Merry Christmas and a Safe and Happy New Year.
and don't forget to Keep on Creating!
 
Don't forget to enter our
12 days Giveaway
We have 3 Couture Creations Prize Packs valued at $50AUD each to giveaway
all the Details on how to enter are HERE
 
http://jordayla.blogspot.com.au/

Wednesday, December 4, 2013

Reindeer Noses by Tracey Cooley

Hi Creators

Every year my 2 beautiful daughters like to give things out to their classmates. Last year was Rudolph chocolates and reindeer food.. this year they decided they wanted to give out reindeer noses....

I purchased some clear plastic bags, malteasers and jaffas' from my local supermarket. Adding 8 malteasers for each reindeer and 1 red for Rudolph to each bag. Cutting cardstock to match the width of my bags and the length required to go from the bottom of the bag and fold over for a front tab.
I then printed all the reindeers names on the back and the name of the contents on the front.

Then with the Couture Creations Scalloped Rectangle nesting dies I feed the cardstock through the die so only one end would cut and scalloped the front edge. I then stapled it to the bag of noses and set about making a cute Rudolph to decorate the front.


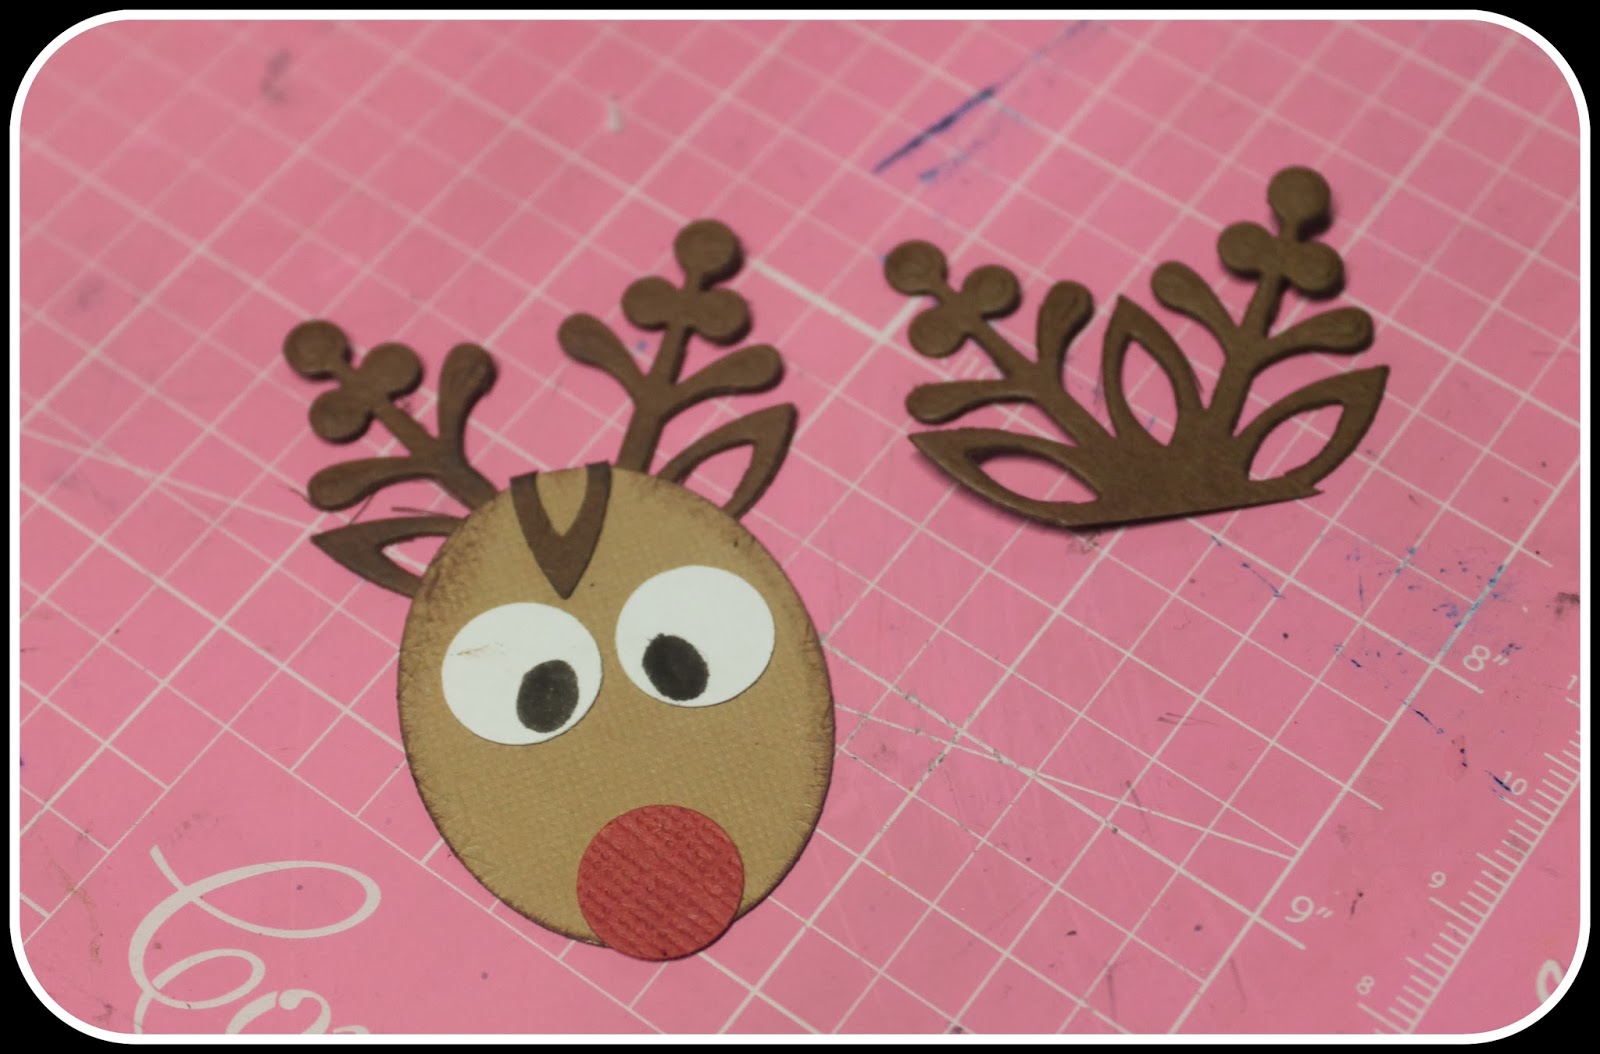
From the Couture Creations Oval Nesting Dies I cut 1 of the 2nd smallest ovals from light brown cardstock. Cut 1 Couture Creations Magical Christmas Tis the Season Die in a darker brown.
ink around the oval with a brown ink for definition.


Cut the snowflake so that 3 leaf shape and 2 stems shapes are left as above  ( you will get 2 from each snowflake)


add the half snowflack to your oval so that the leaf shapes become his ears and the stems become his antlers, folding the middle leaf shape over to form a tuft of mane. Add some small circles for eyes and a nose and viola.... RUDOLPH!! Attach this cute red nose reindeer to the front of your noses...repeat for all classmates and send to school!
 
Keep on Creating!
http://jordayla.blogspot.com.au/

Couture Creations Products Used
CO723044 Nesting Dies Oval
CO723047 Nesting Dies Scallop Rectangle
CO723557 magical Christmas Tis the Season
 

Thursday, November 28, 2013

Christmas Tree Ornament by Dana Tatar


Hi Couture Creations fans! Dana here today sharing a Christmas ornament that I created with pieces of embossed chipboard. This project started out as a mini album kit. Instead of using the triangular tree portions as pages, I glued them all together to create a fun and colorful ornament for the tree!


I embossed each section of the tree with the Wild Holly Embossing Folder. I painted the front and back of each piece with a light coat of gesso and then a colorful Gelato. I highlighted the embossing with Silver Inka-Gold. I dipped the edges of each colorful tree segment in white acrylic paint for a frosty feel. Once the paint was dry, I glued the sections together to form the tree. No Christmas tree is complete without bling, so I embellished the tree with Moonlight Self-Adhesive Pearls and Silver Glitzin' Glamour Glitter Glue.


I created a photo frame for the back of the ornament with the Scalloped Oval and Oval Nesting Dies.


I finished embellishing the back of the ornament with a stamped sentiment and Moonlight Self-Adhesive Pearls.

Thanks so much for stopping by today!


Couture Creations Supplies:
CO723593 Wrapped In Joy Collection - Wild Holly Embossing Folder
CO723045 Scalloped Oval Nesting Dies
CO723044 Oval Nesting Dies
CO721998 Moonlight Self-Adhesive Pearls
CO721970 Silver Glitzin' Glamour Glitter Glue

Wednesday, November 27, 2013

Scalloped Paper Christmas Tree by Kerrie Gurney

Hi it's Kerrie,  with Christmas fast approaching I am in full decorating mode. I just love creating special little décor items for our home and also to give to friends.

I made lots of these paper trees last year and this year a friend asked me to create one for her so I thought I would add a twist to my plain trees by using Couture Creations Scallop Square Nesting Dies to give this tree a cute edge.


this tree is super easy to create,


Die cut 12 of each of the 5 smaller sizes of the Scallop Square nesting dies from old book paper. I die cut 6 sheets at a time, the paper is thin enough to cut through 6 sheets at a time. 


cut a piece of cardboard slightly smaller than the largest die cut square and glue one sheet of die cut book paper, this will be the base of the tree

 
you will need a skewer and a peat pot or some type of pot for your base, push the cardboard base onto the skewer and then hot glue the base to the pot


now starting with the biggest size start layering on the book paper squares
when layering them leave a gap and alternate to give the tree character

 
finish off by adding a poinsettia as a tree topper, die cut 2 small petals and on large and hold together with a small brad

 
smoosh a bit of red Glitzin' Glamour Glitter Glue to the petals and pinch them to add life to the poinsettia


Embellish the base of the pot with some book paper and a poinsettia
 
 
TIP : you could add Crystal Glitzin' Glamour Glitter Glue to the edge of each layer to add some sparkle, or spray the whole tree with adhesive spray and sprinkle with glitter.
 
 
Couture Creations Products Used
 
Happy Christmas Creating
 
 
http://kerriegurney.blogspot.com.au/
 
 
https://www.facebook.com/couture.creations.aus


Sunday, November 24, 2013

Candy Bottle by Pam Bray

 
Hard to believe that Thanksgiving is Thursday....but it is never to late to make a party favor or two....so today I would like to share with you the Candy Bottle I made to place at each guest place  setting.

 
I started with a small bottle and filled it with candy
 
 
Taking some pretty pattern paper that I used a decorative die on I placed Double Sided Tape on each piece and set them to one side
 
 
 I ran a piece of Core'dinations paper through my embossing machine using the
Endless Embossing Folder
 
 sanding it off lightly with my Sanding Block

 
I added the borders that I previously prepared to the embossed piece. 
 
 
Placing a piece o the 18mm x 50mm Double Sided Tape at the end and a few pieces on the back side of the embossed band
 
 
This will help secure it to the bottle and make a nice finished closure to the border band when you place it around the bottle

 
Cut one of the Scallop Circles from pretty pattern paper and place on the lid o the bottle with your Double Sided Tape
 
 
Embossing a few of the leaves using the Endless Embossing Folder, sand them with your Sanding Block and fussy cutting each leaf out, setting them to one side to use on your Candy Bottle lid
 
 
Cut out several of the Sunflower from the Sunflower Nesting Die, spray with water, wad them up and allow them to dry completely
 
 
Add the leaves that you had set to one side to the top of the bottle, glue your Sunflower pieces that you have straighten up a bit to the top of the lid, make sure to keep them scrunched up....add a bronze gemstone to the center. 
 
 
Wrap the brim of the lid with some pretty ribbon, add a few tags or even your guest name to the bottle and place at each of your table setting or give away after the days event.
 
I hope you have a fabulous and joyous Thanksgiving.
Hugs Pammejo

 Couture Creations Supplies:
CO723212 Sunflower Nesting Dies
CO723041 Scallop Circle Nesting Dies
CO723047 Scallop Rectangle Nesting Dies
CO723294 Endless Embossing Folder-All Occasion Collection
CO721965 Double Sided Tape
CO721983 Double Sided Tape
Sanding Block
Premier Cutting Mat
Precision Trimmer
Handheld Essentials
Precision Scissors
Bronze Gemstones