Showing posts with label Romantique. Show all posts

Monday, July 8, 2013

Trinket Box by Sue Smyth


Hello Everyone 


Today I am going to show you how to make this gorgeous little trinket box, you can give as a gift or just keep yourself, using Irish Dreams die. Believe it or not I woke up one Sunday morning with this in my head, I have a metal trinket box very similar to this and while waking up, had an ah ha moment, the Irish Dreams die  shape was the same, so maybe I can make a cardstock trinket box. And the answer is yes I can.


Cut chipboard with the Irish Dreams die twice, you may have to roll through your machine several times to get it to cut well. Or just cut 2 with ordinary cardstock and glue together for strength. Remove all the excess with Couture Creations Tool. 


Coat both chipboard shapes with versamark and apply embossing powder, heat set in the usual way. Once cool rub over black ink, and wipe off with a wet hand towel.

Cut out base pattern, with Couture creations teflon scissors, use double sided tape to construct the box base from Black cardstock 

Box base 

Box lid, the lid is slightly larger than the base.

Emboss black cardstock with cabaret folder, cut strips first and place were the best part of the pattern is.
Rub over versamark and sprinkle with fine silver embossing powder, heat set in the usual way. Adhere all strips to the sides of the box lid.

Adhere one of the embossed chip shapes to the lid and one to the base. Use strong glue and put a weight on it to make a good bond.

Check to see if lid fits over the base and decorate with a metal trinket, some paper leaves and a paper rose.

I have painted the rose with gesso and spritzed with Pomegranate Glimmer mist. Once dry, spray with a little adhesive and sprinkle with a little white glitter. Add pearls as accents, to help the lid adhere to the box, insert 4 silver brads in each corner.  


Couture Creations Materials 


Tuesday, May 14, 2013

Decorated Gift Bag & Tag by Adriana Bolzon


Hello there everyone, 
It's my turn at Couture Creations again today, showing you all a step by step project created with some of the fabulous products from Couture Creations.  My project for today, is a decorated gift bag, the flowers are made from the Couture Creations Scallop Circle Nesting Dies and background from a Couture Creations Annalee Romantique Embossing folder and Couture Creations Victorian Rectangle Nesting Dies.
I always have a stack of these plain brown paper gift bags in my cupboard, and I always decorate them and create a matching card or tag. 


How to create the flowers:-
The Scallop Circle Nesting Die Cuts comes with 6 different sizes, 
for my step by step, let's call the No1 Die the smallest and the largest die cut is No 6.


From Pink Cardstock,
To create the larger flower,  
cut out
2 diecut pieces each of no 6, 
1 diecut piece each of no4, no3 & no2.

To create the smaller flower 
cut out
1 diecut of no4, no3 & no2 from pink card stock.


Cut a triangle cone shape out of each scallop circle. 
Gently cut along between every third scallop shaped edges to the center, 
but not all the way through. 
Repeat this process for all the scallop circles.


Ink all the edges with raspberry ink.


Overlap one petal on top of the next petal where you made the cut, adhere with double sided tape.  Repeat process to all flower petals.


With a bamboo skewer or thin stick, curl all the edges of the petals over, this will give them dimensions to each petal. Pierce a hole in the center of each flower, place smaller flower inside middle flower and this inside the large flower, place Kaisercraft pearl brad through centre of flower.

Cut a piece of Black Magic Core'dinations Hermit GX-BM570 coloured card stock, fit inside the Annalee Romantique Embossing folder, once embossed, gently sand over cardstock to reveal embossed image. 


Cut 2 Victorian Rectangle Nesting Dies , from brown card stock, ink edges with Vintage Photo Distress Ink, then cut in half, place and adhere on top and bottom side of embossed Black Magic cardstock. Adhere this cardstock on the front of paper bag with double sided tape. Adhere flowers with doubled sided foam in the middle.


Add Pink Glitzin Glamour Glitter Glue to the edges of flowers, rub gently glitter glue with your finger over petals, this will give a bit of bling and glitter to your flowers, leave to dry.


I also created a simple small gift tag with the a small flower, using the same step by step,
adding a twine bow on the top.


........so, I hope I have given you all a little inspiration to create your own gift bags with tags, and create stunning flowers with Couture Creations Nesting Dies.
Happy crafting everyone :)     Cheers Adriana XX


Couture Creations made sure you add you email address to get the latest newsletter.


Don't forget to join 
Couture Creations FACEBOOK
for all the latest updates from Couture Creations


Thursday, May 9, 2013

Memories Mini Album by Jo Piccirilli

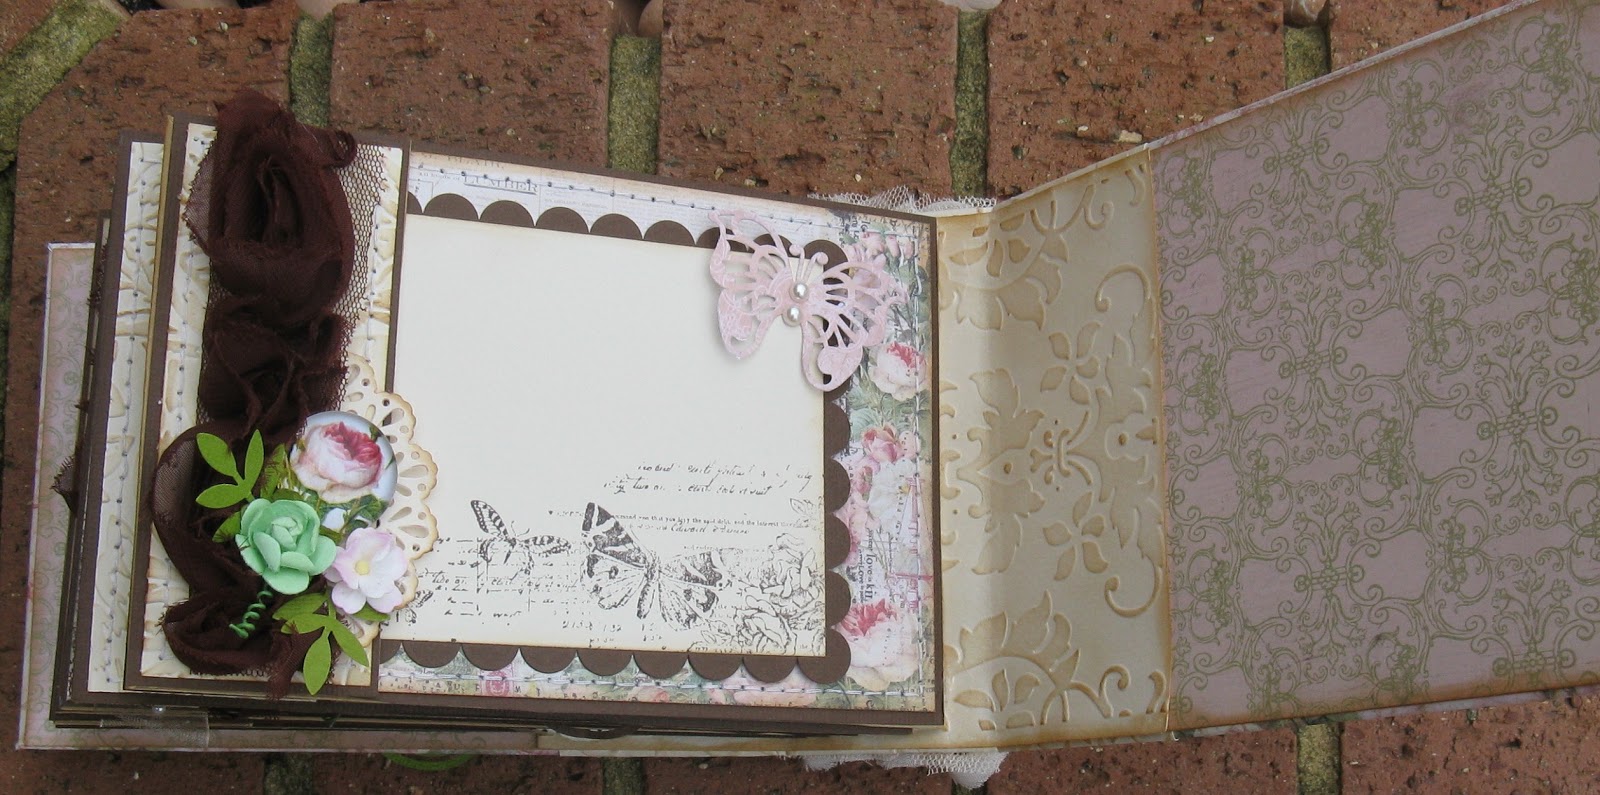
Hey scrappers!  Its Jo and I'm back today to share a mini album I have made using Couture Creations yumminess.
 
I LOVE making mini albums.  I don't have a tutorial for this but you will find heaps of different ideas on Youtube.
 
 
This mini was made with paper bags which allows for lots of pockets.  I stuck most of them down.
 
On the front I have used my Rectangle Nesting Dies to create a frame.  I have also used the tranquillity flourish die from the Endless Dreams Collection.  I have also used the new doily dies (Ivy Set).  These little doilys are a perfect size for mini albums and also cards.  I can see these being used all the time and are becoming a firm favourite.
 
To bind my book I have used the Damask Flourish embossing folder and rubbed a bit of ink over it to give it a warm look.  The butterfly is also a die.
 
 
Here I have used my circle and scallop nesting dies to create a mat for my photo.  The embossing folder is Pastorale from the Romantique Collection.
 
 
Again I have used the circle nesting dies and embossed them with the large damask embossing folder and the Dandiya embossing folder.  Another doily die too slipped underneath and finished with the magical butterfly die.
 
 
The paisley border nesting die was used to  make this frame, which I left open to slip a photo in.
 
The hearts nesting dies have been used to create an embellishment on this page along with the doily die.  I have also used the tranquility flourish tucked under the blossom (another fav die I use all the time).
 
By using the rectangle nesting dies and the scallop rectangle nesting dies I was able to make two photo mats, and there is that pretty tranquility flourish again (see told you it was a favourite :)).
 
 
I used just the top part of the Dandiya embossing folder as the photo mat on this page and the Petite Fleur embossing folder with a piece of patterned paper down the middle to make the base of the next page. 
 
 
The page on the right was made using the Bradshaw embossing folder (a fav) from the Romantique Collection.  I used my hearts nesting dies to cut out a couple of chipboard hearts and then I embossed them with the large Damask Flourish embossing folder and rubbed some ink over the top.
 
 
I kept a pocket on this page and made a tag using the rectangle and scallop nesting dies.  Another half doily poking out of the flower cluster and magical butterfly to finish.


I had so much fun making this!  If you click on the actual pics you will get a closer look.  I hope I have inspired you to pull out your embossing folder and dies and don't forget to upload your beautiful creations to our Facebook wall.  We LOVE seeing your work!
 
Until next time
 
 
Couture Creations products used: